 |
| 10mm Hesse-Kassel Brigade for the War of the Spanish Succession
There is some debate as to whether the War of the Spanish Succession or the later Seven Years War should be considered the "First World War" as conflicts take place in both the New World and the Old World during this period. We are, initially, planning to use the Black Powder rules from Warlord Games though I'm also keen to give Twilight of the Sun King a try as well.
And, of course, painting up 10mm War of the Spanish Succession figures has got me interested in 10mm Fantasy! Orcs, Ogres and Giants are on the way.
|

Ruminations upon Victorian Science-Fiction, Samurai Skirmish Games, 15mm Fantasy Skirmish, 15mm Wargames, 10mm Wargames, RPGs, 6mm Fantasy, and 6mm Science Fiction Wargaming
Monday, 21 August 2017
[15mm Fantasy/10mm WSS] Painting Log Update for July
Finally updated my Modelling Log for July with some Dwarves and Wood Elves and the first 10mm scale figures I've painted for a War of the Spanish Succession project.
Saturday, 8 July 2017
[15mm Fantasy] Some thoughts on basing
Occasionally, the subject of multi-basing comes up. I thought it might be useful to show how I do it - in case my process helps inspire someone else.

Having completed painting up a unit of 15mm Dwarves (or Dwarians) from Battle Valor Games, I first glued the figures to the bases with PVA glue. I use 40mm x 20mm or 40mm x 40mm bases, for a regimental foot print of 80mm x 40mm, though lately I've started to move towards a 120mm x 40mm foot print and a larger unit. The 80mm x 40mm regimental foot print works well for Lord and Lands and Kings of War, while the larger unit works better for Battlesystem.
The right-hand base currently only has five figures on it. The missing figure - the standard bearer - is still on the painting lid while I work on the standard.

Once the glue holding the figures had dried, I painted the bases with a PVA and water mix and then added sand for texture. While that was drying, I added some larger stones as boulders. I kept the space where the standard bearer was to go clear of sand so there would be a clean surface for the glue to grip. In the background, the unit's standard - made from standard weight printer/photocopier paper - has been added to the standard pole.

Once the sand and PVA mix had dried, I then painted the sanded base with black undercoat to seal it.

Once the undercoat had dried, I then painted the bases with my base green - Tamiya Nato Green XF-67 - and painted the "boulders" and some of the sand Games Workshop Mechanicus Standard Grey - in my Fantasy world, all stones are granite or slate.
The eagle on the Dwarian standard is a Veni Vidi Vici transfer and the patterning on the yellow border was made with a fine tipped felt-tipped pen.

Once the paint was dry, and the standard was complete, the standard bearer was glued to the base. After everything had dried, I then coated areas of the base with a PVA and water mix, and then flocked. I have two different colours of flock I use as fields do not tend to be a uniform green colour.

The completed unit. Painting on the PVA/water mix allowed me to control where the flock adhered, which allowed the boulders to pretty much emerge from the flock unscathed.
And that's pretty much it. Given the drying times of each process, I tend to paint the figures during the weekend and then work through the basing during the week - one step each evening.
Further examples are here on my Modeling Log.
Wednesday, 17 May 2017
[15mm Fantasy] Painting Log Update for April

Another update of my painting log featuring, amongst others, these Battle Valor Games Dwarian Crossbows.
Wednesday, 19 April 2017
[15mm Fantasy] Painting Update for March
I managed to get a few more figures painted in March than in February. Here are a few extra random photos:

Battle Valor Games Bullites - big, Ogre-sized monsters with big axes and bad attitudes.

Bullite and Battle Valor Games Dwarian Champions with Eureka Wood Elves - an indication of size.

The Battle Valor Games Dwarians I painted this month.

Dwarian Mounted Scout/Crossbows.

Dismounted Dwarian Crossbow/Skirmishers
More pictures on my modelling log.
Wednesday, 5 April 2017
[RPGs] The Trouble with Trolls
Last weekend, we resumed our AD&D game after a brief hiatus.
The party had discovered a pair of enchanted jars which transported a person from one jar to the other. One jar was located in the dungeon under the old ruined town of Poulcatte - we had moved it from where we had first discovered it to a more defensible location - while the other had been in an abandoned house in the new town of Poulcatte, until we moved it to our house (which we were forced to sell to the Temple in return for some Resurrections due to a partial TPK) and then to our lodgings at the Sleeping Dragon Inn. We had had some plans to use the jars to give us ready (and secret) access to the dungeon but, on the occasion of the partial TPK, we had discovered that the Trolls who had caused the partial TPK could also pass through the jars into the basement of our house.
After a fierce battle, and some blind luck, the invading Trolls were dispatched, the dead members of the party were carted off for Resurrection, and the house - still reeking of burnt Troll - was handed over to the Temple to settle the outstanding bill.
A few days later (ie at the start of the latest session), the party decided to return to the dungeon to explore some more and, hopefully, recoup some of their financial losses.
On our previous excursion - the one that went rather pear-shaped and nearly resulted in a TPK - Asingel the Mighty, Half-Elf Fighter, had been the first to pass through the Magic Jars into the Jar Room, and had then been surprised by the Trolls. This time, Bayern the Ranger decided to lead. Popping out of the Magic Jar in the Jar Room, he discovered two Trolls peering down the hole at the far end of the room, which lead to the Giant Mushroom cavern.
As he had Surprise on the trolls, Bayern was able to leap back through the Magic Jar to warn the rest of us of the presence of Trolls. Undeterred by the danger, we decided to attack! We discovered that by carefully positioning ourselves around the Magic Jar, multiple people could pass through the Jar at once.
Halbeard the Dwarf Fighter, Bayern the Ranger, and Asingel the Fighter formed the front rank, with Caine the Magic User/Cleric and Arloc the Fighter/Assassin in support. The Trolls obliged by charging.
After a brief, yet fierce, battle, the Trolls were dispatched in the time-honoured fashion. During this process, it was noted that both Trolls had an oddly deformed ear. The party then debated as to which direction to explore.
At this point, Bayern scouted the hall outside the Jar Room and spotted another Troll lurking way down the passage in the next large room.
As Bayern rangered his way down the hall, the Troll moved out of sight towards the door to the right. Giving chase, the party fought and dispatched this Troll as well. Again, it had a deformed ear - very puzzling.
Through the door to the right, we found a Magic Jar wedged in the ceiling of the next room. Periodically, a blob of flesh would drop through the jar, land on the floor, and then grow into a Troll. Ewww! We suspect that a Troll is trapped against the other end of the Magic Jar and as it regrows the damage inflicted upon it by the Jar, a piece of Troll flesh is removed by the Jar and dropped into this room, where it becomes a clone of the original Troll.
Bayern managed to wedge a piece of dungeon detritus into the mouth of the Jar, which seemed to stop the Troll pieces coming through. There is a possibility we have set up a feedback loop where the piece of Troll flesh will bounce backwards and forwards between the Magic Jars until a, rather confused, Troll regenerates and breaks out one end or the other.
Beyond this room, we found another series of corridors, and another Troll. This Troll was dispatched by Arloc who sneaked up and assassinated it.
To be continued ...
This was the first opportunity I have had to use my new Hirst Arts dungeon tiles. We were all pleased at how well these worked, and looked, on the table. I need to get another set, and some more doors and doorways.
The party had discovered a pair of enchanted jars which transported a person from one jar to the other. One jar was located in the dungeon under the old ruined town of Poulcatte - we had moved it from where we had first discovered it to a more defensible location - while the other had been in an abandoned house in the new town of Poulcatte, until we moved it to our house (which we were forced to sell to the Temple in return for some Resurrections due to a partial TPK) and then to our lodgings at the Sleeping Dragon Inn. We had had some plans to use the jars to give us ready (and secret) access to the dungeon but, on the occasion of the partial TPK, we had discovered that the Trolls who had caused the partial TPK could also pass through the jars into the basement of our house.
After a fierce battle, and some blind luck, the invading Trolls were dispatched, the dead members of the party were carted off for Resurrection, and the house - still reeking of burnt Troll - was handed over to the Temple to settle the outstanding bill.
A few days later (ie at the start of the latest session), the party decided to return to the dungeon to explore some more and, hopefully, recoup some of their financial losses.
 |
| Bayern finds two Trolls in the Jar Room - 15mm fighter figure from Splintered Light Miniatures, 15mm Trolls from Alternative Armies HoT Fantasy range, 15mm door from Ral Partha Europe, dungeon tiles from Hirst Arts |
 |
| Same scene, different angle - My first opportunity to use the dungeon tiles I had painted up. Very pleased with the result. |
 |
| The party enters the Jar Room and the Trolls attack. |
 |
| After defeating the Trolls, the party debated which way to explore - through the large room at the end of the corridor, or further down the small passage that ran off to the left. |
 |
| Bayern spots another Troll - this settled the direction in which to explore. Each tile square is 6' so the Troll in the far room is just on the edge of Bayern's IR vision range. |
 |
| Bayern chases after the Troll as the rest of the party trail along behind. |
Through the door to the right, we found a Magic Jar wedged in the ceiling of the next room. Periodically, a blob of flesh would drop through the jar, land on the floor, and then grow into a Troll. Ewww! We suspect that a Troll is trapped against the other end of the Magic Jar and as it regrows the damage inflicted upon it by the Jar, a piece of Troll flesh is removed by the Jar and dropped into this room, where it becomes a clone of the original Troll.
Bayern managed to wedge a piece of dungeon detritus into the mouth of the Jar, which seemed to stop the Troll pieces coming through. There is a possibility we have set up a feedback loop where the piece of Troll flesh will bounce backwards and forwards between the Magic Jars until a, rather confused, Troll regenerates and breaks out one end or the other.
Beyond this room, we found another series of corridors, and another Troll. This Troll was dispatched by Arloc who sneaked up and assassinated it.
To be continued ...
This was the first opportunity I have had to use my new Hirst Arts dungeon tiles. We were all pleased at how well these worked, and looked, on the table. I need to get another set, and some more doors and doorways.
Wednesday, 15 March 2017
[15mm Fantasy] Painting log update February
 |
| Elvian Cavalry from Battle Valor Games |
February was a fairly unproductive month, painting-wise. It was high summer here, with the sort of heat that dried paint on the brush betwixt jar and figure.
 Eventually I did manage to finish a unit of Elvian Cavalry from Battle Valor Games. This unit consisted of a front rank of lancers on half-armoured horses with a rear rank of lancers on unarmoured horses.
I replaced the plain shields with sun-embossed shields.
More photos on my modelling log.
Monday, 20 February 2017
[15mm Fantasy] Painting Log Update for January 2017
 |
| Goblians from Battle Valor Games |
Saturday, 7 January 2017
[15mm Fantasy] Lord and Lands Battle - Battle of Uram
Today I had my first (solo) game of Lord and Lands, a set of Fantasy Mass Battle rules written by Craig Armstrong - there's a Facebook page for the rules. It was nice to finally get some of the figures I've been painting for the last year on the table.
Rules: Lord and Lands
Scale: 15mm
Table Size: 3' x 3'
Game Size: 1000 points a side
Background:
The lands between the arms of the Attak Mountains are dominated by a number of hostile Orc clans. Internal divisions and inter-tribal warfare have thus far limited Orcish adventures beyond the Attaks to small scale raids. Periodically, an Orc Warlord arises who attempts to unite the tribes but, fortunately for their neighbors, such warlords seldom cling to power for long.
In the 942nd Year of King Deldrach of Ruvaen, in the month of the Osprey, Grogmar Khan of the Orcians of Mt Durfang lead his clan out to war. With dreams of glory dancing in his head, he decided that an easy victory would set him on the road to power. Consequently, he headed south-westward against the Goblin Town of Uram.
As "news travels fast in the Attaks, and bad news doubly so", King Biark of Uram was aware of Grogmar Khan's movements. Summoning his nobles in their chariots, and raising his levies, Biark set off up the Durfang Road. Along the way, he recruited Orog Mossridge and his band of Ogres and summoned a clutter of Giant Spiders from the deep woods north of Uram.
Deploying across the Durfang Road, Biark arrayed his forces and awaited Grogmar's approach.
Deployment:
On the Orcian Right Flank, five units of Orc Warriors.
In the Orcian Center, two units of archers deploy across the road, ahead of two units of Orcian Brutes. A unit of wargs is deployed to their left. The Orcian Shaman is in front of the lead unit of Brutes while Grogmar, on his warg, watches on from the ridge.
Way out on the left wing is deployed the second unit of Wargs.
In the Center, King Biark in his chariot lines up with two units of Goblin Foot. In front of them, Orog Mossridge and his two units of Ogres deploy with the Goblin Shaman. In front of them are deployed two units of Goblin Archers.
On the Goblin Right Flank, another Clutter of Giant Spiders stand ready to advance into the large wood, while on the far Right Flank are another unit of Goblin Wolf Riders, followed by another unit of Goblin Chariots.
The Battle:
The Orcians seized the initiative (they were to dominate the initiative rolls for the entire battle - the Goblins only getting the initiative on one turn when they equaled the Orcian initiative roll) and Grogmar Khan ordered the advance. He had concentrated his foot units on his right, and in his center - all the better to overwhelm the Goblin left.
As his right rolled down from the ridge, the Goblin Wolfriders moved up to the little wood on the Goblin left, while the left-most Clutter of Giant Spiders slipped in amongst the trees.
In the center, a warg unit rushed ahead of the advancing Orcian archers, ready to sweep down on the Goblin Archers slowly advancing towards them.
On the Orcian left, the second Warg unit was only meant to demonstrate against the Goblin right while the main attack was delivered by the Orcian left and center. Seeing the Goblin Wolfriders, the Wargs advanced rapidly towards them. Grogmar sent his Shaman to support the Wargs as he had noticed the second Clutter of Giant Spiders slipping through the Great Wood to outflank them. The Shaman fired a Fire Ball at the Spiders, only to have it fizzle out harmlessly in the brush and ground cover.
On the Orcian Right Flank, a unit of Orcian warriors pressed home their attack against the Goblin Left Flank Wolfriders. With support from the Giant Spiders, the Wolfriders began to inflict casualties on the Orcians.
On the Goblin Right Flank, the Orcian Wargs and Goblin Wolfriders were mixing it up as the Giant Spiders in the Great Wood swept out of cover to attack a unit of Orcian Brutes.
The Giant Spiders began to chew into the Orcian Brute unit.
The fighting on the Goblin Right flank was fierce, with both the Goblin Wolfriders and the Orcian Wargs taking casualties.
In short order on the Goblin Left, as the Goblins briefly seized the initiative, the Goblin Chariots moved up to provide rear support to the Goblin Wolfriders. The lead Orcian unit was dispersed, as were the Goblin Wolfriders in the fierce fighting. The Giant Spiders swept forward and heavily damaged the next Orcian unit, only to be dispersed in turn.
In the center, the Ogres dispersed the Orcian Wargs and then engaged a unit of Orcian Archers. The left hand Ogre unit then charged into an Orcian unit. While the Goblin Archers rushed up to support the Ogres, a second Orcian unit moved up in support of the unit fighting the Ogres.
The Ogres soon disposed of the Orcian Archers and began to roll forward. On the Orcian left flank, Grogmar rushed up to join the battered unit of Orcian Brutes who had just dispersed the right flank Giant Spider unit.
On the Orcian left flank, once the Giant Spiders had been dealt with, the battered Orcian Brute unit could see the Goblin Chariots starting to move up against them.
The Goblin Chariots charged home against the Orcian foot, just as a second Orcian unit moved up to support them.
In the center, casualties were mounting on the Ogre units.
In the center, King Biark slowly advanced his line of Goblin foot, ready to exploit any Orcian collapse.
On the Goblin Right Flank, the Goblin Chariots crashed into the Orcian Brutes. Grogmar Khan had intended to rally his Brutes, but he ran out of time. The Orcian Brutes fought hard but, battered by the earlier encounter with the Giant Spiders, they could not resist the Goblin Chariots and broke and fled. Grogmar was pulled down and killed in the route.
And so ended the Battle of Uram - an unexpected victory for the Goblins of Uram.
I really enjoyed the Lord and Lands rules, and I expect I made some mistakes with them. Having played a bit of DBA 3.0 lately, I found myself moving each side in its entirety, rather than alternating moving units as Lord and Lands requires. It was also late in the game when I realized that units can support from the rear.
The battle was very close. The Goblins had lost six units, with an army break of 7, when the Orcians lost the Brutes and the General to hit their break of 6.5. If Grogmar had managed to either rally the Brutes, or move away from them, the Orcians would have had a chance in the following turn of taking out the Goblins.
Figures used:
Orcians - Orcian infantry and Wargs from Battle Valor Games
Goblins - Goblin Chariots and some Goblin Infantry and Archers from Magister Militum
Goblin Wolfriders and some Goblin Infantry and Archers from Splintered Light
Giant Spiders from Copplestone
Ogres from Battle Valor Games
Casualty Markers - Battle Valor Games
Rules: Lord and Lands
Scale: 15mm
Table Size: 3' x 3'
Game Size: 1000 points a side
Background:
 |
| The North-West Corner of the Olde Worlde |
In the 942nd Year of King Deldrach of Ruvaen, in the month of the Osprey, Grogmar Khan of the Orcians of Mt Durfang lead his clan out to war. With dreams of glory dancing in his head, he decided that an easy victory would set him on the road to power. Consequently, he headed south-westward against the Goblin Town of Uram.
 |
| Orcian Army - my adaption of the basic Orc List |
 |
| My Goblin List - a variant on the basic Orc List |
 |
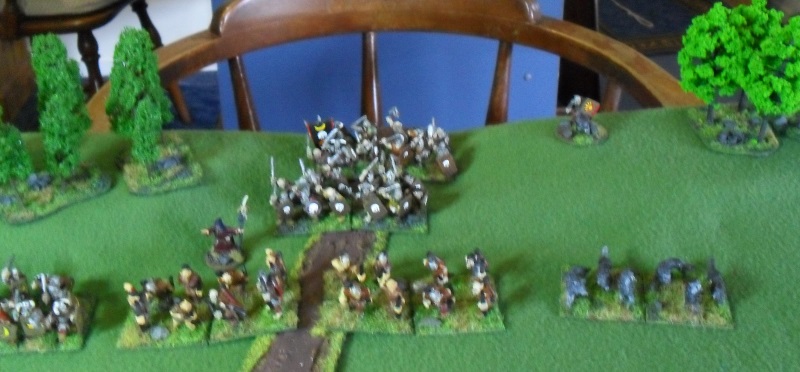
| The Goblin Army deploys across the Durfang road (bottom of picture) while the Orcians deploy through the pass (top of picture). |
 |
| Orcian Right Flank |
 |
| Orcian Center |
 |
| Orcian Left Flank |
 |
| Goblin Left Flank |
A unit of wolf riders deploy on the left flank, supported by a unit of chariots. To their right is deployed the first Clutter of Giant Spiders.
 |
| Goblin Center |
 |
| Goblin Right Flank |
The Battle:
 |
| Goblin Left Flank |
As his right rolled down from the ridge, the Goblin Wolfriders moved up to the little wood on the Goblin left, while the left-most Clutter of Giant Spiders slipped in amongst the trees.
 |
| Action in the center |
 |
| Goblin Right Flank |
 |
| Goblin Left Flank |
 |
| Goblin Left Flank and Center |
While Goblin Wolfriders and the Giant Spiders held up the Orcian advance on the Orcian Right, another Orcian unit moved towards the center, passing around the left edge of the little wood.
In the center, a unit of Orcian Archers, with their heavier bows, swiftly dispersed one of the units of Goblin Archers.
 |
| Orcian Right Flank |
On the Orcian Right Flank, casualties began to mount on the lead Orcian unit as the Goblin Wolfriders and the Giant Spiders pressed home their attack.
 |
| Goblin Right Flank |
 |
| Goblin Right Flank - the Spiders attack! |
 |
| Goblin Right Flank |
 |
| Goblin Left Flank |
 |
| Center |
 |
| Center |
 |
| Goblin Right Flank |
 |
| Goblin Left Flank |
 |
| Goblin Left Flank |
The Goblin Chariots were recoiled by the Orcian Foot.
 |
| Center |
 |
| The battlefield in Turn 4 |
 |
| Goblin Right Flank - the final moments of the battle. |
And so ended the Battle of Uram - an unexpected victory for the Goblins of Uram.
I really enjoyed the Lord and Lands rules, and I expect I made some mistakes with them. Having played a bit of DBA 3.0 lately, I found myself moving each side in its entirety, rather than alternating moving units as Lord and Lands requires. It was also late in the game when I realized that units can support from the rear.
The battle was very close. The Goblins had lost six units, with an army break of 7, when the Orcians lost the Brutes and the General to hit their break of 6.5. If Grogmar had managed to either rally the Brutes, or move away from them, the Orcians would have had a chance in the following turn of taking out the Goblins.
Figures used:
Orcians - Orcian infantry and Wargs from Battle Valor Games
Goblins - Goblin Chariots and some Goblin Infantry and Archers from Magister Militum
Goblin Wolfriders and some Goblin Infantry and Archers from Splintered Light
Giant Spiders from Copplestone
Ogres from Battle Valor Games
Casualty Markers - Battle Valor Games
Subscribe to:
Posts (Atom)