Showing posts with label Battles. Show all posts

Saturday, 7 January 2017

[15mm Fantasy] Lord and Lands Battle - Battle of Uram

Today I had my first (solo) game of Lord and Lands, a set of Fantasy Mass Battle rules written by Craig Armstrong - there's a Facebook page for the rules. It was nice to finally get some of the figures I've been painting for the last year on the table.

Rules: Lord and Lands
Scale: 15mm
Table Size: 3' x 3'
Game Size: 1000 points a side

Background:
The North-West Corner of the Olde Worlde
The lands between the arms of the Attak Mountains are dominated by a number of hostile Orc clans. Internal divisions and inter-tribal warfare have thus far limited Orcish adventures beyond the Attaks to small scale raids. Periodically, an Orc Warlord arises who attempts to unite the tribes but, fortunately for their neighbors, such warlords seldom cling to power for long.

In the 942nd Year of King Deldrach of Ruvaen, in the month of the Osprey, Grogmar Khan of the Orcians of Mt Durfang lead his clan out to war. With dreams of glory dancing in his head, he decided that an easy victory would set him on the road to power. Consequently, he headed south-westward against the Goblin Town of Uram.

Orcian Army - my adaption of the basic Orc List
As "news travels fast in the Attaks, and bad news doubly so", King Biark of Uram was aware of Grogmar Khan's movements. Summoning his nobles in their chariots, and raising his levies, Biark set off up the Durfang Road. Along the way, he recruited Orog Mossridge and his band of Ogres and summoned a clutter of Giant Spiders from the deep woods north of Uram.

Deploying across the Durfang Road, Biark arrayed his forces and awaited Grogmar's approach.

My Goblin List - a variant on the basic Orc List
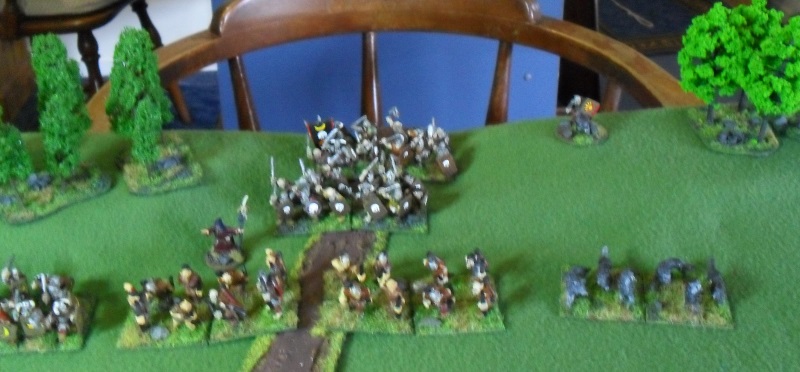
Deployment:
The Goblin Army deploys across the Durfang road (bottom of picture) while the Orcians deploy through the pass (top of picture).
Orcian Right Flank
On the Orcian Right Flank, five units of Orc Warriors.

Orcian Center
 In the Orcian Center, two units of archers deploy across the road, ahead of two units of Orcian Brutes. A unit of wargs is deployed to their left. The Orcian Shaman is in front of the lead unit of Brutes while Grogmar, on his warg, watches on from the ridge.

Orcian Left Flank
Way out on the left wing is deployed the second unit of Wargs.

Goblin Left Flank
A unit of wolf riders deploy on the left flank, supported by a unit of chariots. To their right is deployed the first Clutter of Giant Spiders.

Goblin Center
In the Center, King Biark in his chariot lines up with two units of Goblin Foot. In front of them, Orog Mossridge and his two units of Ogres deploy with the Goblin Shaman. In front of them are deployed two units of Goblin Archers.

Goblin Right Flank
On the Goblin Right Flank, another Clutter of Giant Spiders stand ready to advance into the large wood, while on the far Right Flank are another unit of Goblin Wolf Riders, followed by another unit of Goblin Chariots.

The Battle:

Goblin Left Flank
The Orcians seized the initiative (they were to dominate the initiative rolls for the entire battle - the Goblins only getting the initiative on one turn when they equaled the Orcian initiative roll) and Grogmar Khan ordered the advance. He had concentrated his foot units on his right, and in his center - all the better to overwhelm the Goblin left.

As his right rolled down from the ridge, the Goblin Wolfriders moved up to the little wood on the Goblin left, while the left-most Clutter of Giant Spiders slipped in amongst the trees.

Action in the center
 In the center, a warg unit rushed ahead of the advancing Orcian archers, ready to sweep down on the Goblin Archers slowly advancing towards them.

Goblin Right Flank
On the Orcian left, the second Warg unit was only meant to demonstrate against the Goblin right while the main attack was delivered by the Orcian left and center. Seeing the Goblin Wolfriders, the Wargs advanced rapidly towards them. Grogmar sent his Shaman to support the Wargs as he had noticed the second Clutter of Giant Spiders slipping through the Great Wood to outflank them. The Shaman fired a Fire Ball at the Spiders, only to have it fizzle out harmlessly in the brush and ground cover.

Goblin Left Flank 
On the Orcian Right Flank, a unit of Orcian warriors pressed home their attack against the Goblin Left Flank Wolfriders. With support from the Giant Spiders, the Wolfriders began to inflict casualties on the Orcians.

Goblin Left Flank and Center
While Goblin Wolfriders and the Giant Spiders held up the Orcian advance on the Orcian Right, another Orcian unit moved towards the center, passing around the left edge of the little wood. 
In the center, a unit of Orcian Archers, with their heavier bows, swiftly dispersed one of the units of Goblin Archers.
Orcian Right Flank
On the Orcian Right Flank, casualties began to mount on the lead Orcian unit as the Goblin Wolfriders and the Giant Spiders pressed home their attack.

Goblin Right Flank
 On the Goblin Right Flank, the Orcian Wargs and Goblin Wolfriders were mixing it up as the Giant Spiders in the Great Wood swept out of cover to attack a unit of Orcian Brutes.

Goblin Right Flank - the Spiders attack!
 The Giant Spiders began to chew into the Orcian Brute unit.

Goblin Right Flank
The fighting on the Goblin Right flank was fierce, with both the Goblin Wolfriders and the Orcian Wargs taking casualties.

Goblin Left Flank
In short order on the Goblin Left, as the Goblins briefly seized the initiative, the Goblin Chariots moved up to provide rear support to the Goblin Wolfriders. The lead Orcian unit was dispersed, as were the Goblin Wolfriders in the fierce fighting. The Giant Spiders swept forward and heavily damaged the next Orcian unit, only to be dispersed in turn.

Center
 In the center, the Ogres dispersed the Orcian Wargs and then engaged a unit of Orcian Archers. The left hand Ogre unit then charged into an Orcian unit. While the Goblin Archers rushed up to support the Ogres, a second Orcian unit moved up in support of the unit fighting the Ogres.

Center
 The Ogres soon disposed of the Orcian Archers and began to roll forward. On the Orcian left flank, Grogmar rushed up to join the battered unit of Orcian Brutes who had just dispersed the right flank Giant Spider unit.

Goblin Right Flank
On the Orcian left flank, once the Giant Spiders had been dealt with, the battered Orcian Brute unit could see the Goblin Chariots starting to move up against them.

Goblin Left Flank
The Goblin Chariots charged home against the Orcian foot, just as a second Orcian unit moved up to support them.

Goblin Left Flank
The Goblin Chariots were recoiled by the Orcian Foot.


Center
 In the center, casualties were mounting on the Ogre units.

The battlefield in Turn 4
 In the center, King Biark slowly advanced his line of Goblin foot, ready to exploit any Orcian collapse.


Goblin Right Flank - the final moments of the battle.
On the Goblin Right Flank, the Goblin Chariots crashed into the Orcian Brutes. Grogmar Khan had intended to rally his Brutes, but he ran out of time. The Orcian Brutes fought hard but, battered by the earlier encounter with the Giant Spiders, they could not resist the Goblin Chariots and broke and fled. Grogmar was pulled down and killed in the route.

And so ended the Battle of Uram - an unexpected victory for the Goblins of Uram.

I really enjoyed the Lord and Lands rules, and I expect I made some mistakes with them. Having played a bit of DBA 3.0 lately, I found myself moving each side in its entirety, rather than alternating moving units as Lord and Lands requires. It was also late in the game when I realized that units can support from the rear.

The battle was very close. The Goblins had lost six units, with an army break of 7, when the Orcians lost the Brutes and the General to hit their break of 6.5. If Grogmar had managed to either rally the Brutes, or move away from them, the Orcians would have had a chance in the following turn of taking out the Goblins.

Figures used:
Orcians - Orcian infantry and Wargs from Battle Valor Games
Goblins - Goblin Chariots and some Goblin Infantry and Archers from Magister Militum
                Goblin Wolfriders and some Goblin Infantry and Archers from Splintered Light
                Giant Spiders from Copplestone
                Ogres from Battle Valor Games

Casualty Markers - Battle Valor Games

Thursday, 8 September 2016

[15mm Historicals] Italian Wars Battle

Francesco Sforza - everyone's crazy
about a sharp dressed man
On Saturday night Jonathan and I had a game of Field of Glory. Jonathan is a FoG fan, specializing in the late Dark Ages/Early Medieval period. The earliest army I have figures for, apart from my Fantasy collection, is my Italian Condotta army which I used to play DBR with.

Jonathan borrowed a bunch of Medieval figures from John and was tossing up between using a French Army or a German Army for the Italian Wars period. Eventually, he opted for a German force.

With Jonathan's help I constructed a Milanese army that ended up looking like this:


Sforza Milanese (Italian Condotta)
1 Commander in Chief(Inspired)@ 80
1 Sub-Commander(Standard)@ 35
(1, 1)2 Battlegroups4 Mtd XBowLight HorseUnProcAvgDrilledXbow@ 84
(2, 2)2 Battlegroups2 Famiglia DucaleKnightsHvy ArmrSupDrilledLance/Sword@ 104
(3)1 Battlegroup6 Merc M-at-ArmsKnightsHvy ArmrAvgDrilledLance/Sword@ 126
(3)1 Battlegroup2 BombardsHvy ArtAvgUnDrilledHvy Arty@ 40
(4)1 BattlegroupPikemenHvy FootProtAvgDrilledPike@ 72
597 Points

The German General -
an eyewitness description
Jonathan's Medieval German army consisted of two Generals, 2 Battlegroups of Knights, a Battlegroup of two Heavy Guns, a unit of Defensive Spears, a unit of Crossbowmen, and a unit of Skirmishing Handgunners.

Milanese Deployment
After laying out terrain, we deployed. Field of Glory uses an army order-of-march to deployment system (the numbers in the brackets in the army list indicate which "division" of the order-of -march each unit is in) which meant that I deployed my light horse on either flank; a unit of Famiglia Ducale (Household Cavalry) on the left, behind the Light Horse and between the area of brush and the swamp; the second unit of Famiglia Ducale with the General alongside the large unit of Mercenary Knights to the right of the swamp; the pike block to the right of the horse; and in front of the pike, the two battlegroups of Crossbowmen.

The Heavy Guns were deployed to the right of the Crossbowmen, and the second unit of Mounted Crossbowmen Light Horse filled the gap to the area of brush on the right flank.

The Milanese Sub-Commander was in command of the Infantry, while the Commander-in-Chief commanded the Horse.

To the rear of the right flank area of brush, the Milanese pitched their camp.

View of the Milanese battle line from the German point of view.
The second photo shows the Milanese battleline in more detail. On the Milanese left (right of photo) can be seen the Light Horse leading the Famiglia Ducale; then the main body of knights and the pike block. The two battlegroups of Crossbowmen cover both the front of the pikes, and part of the front of the Knights. The Heavy Guns and the other unit of Light Horse deploy on the Milanese right (left of photo).

The German deployment
Across the field, the Germans were also deploying. On their right, separated from the rest of the army by a long ridge, was mustered their cavalry. Behind a small wood near the center, they pitched their camp. The Milanese could see movement within the wood, which could have been camp servants hanging washing and cutting wood for the dinner fires, or something more sinister and ambush-like.

To the left of the camp, and back from the center, the German Heavy Guns were deployed, while to the left of the guns were deployed a battlegroup of Spearmen, and a unit of Crossbowmen. Unbeknownst to the Milanese, a unit of Skirmishing Handgunners lurked in ambush in the wood on the German left flank.

Milanese Left - the German Knights (top) advance towards the Famiglia Ducale
and the Milanese Knights (bottom). The Milanese Light Horse slip out to the left.
As the massed Knights on the German right began to roll forward, the Milanese Light Horse swept around the edge of the area of brush and dashed out onto the left flank.

Meanwhile, the Milanese Infantry advanced and began to swing towards the right, towards the German Infantry, opening up a gap for the Milanese Knights to move forward to face the advancing German horse.

Milanese Crossbowmen advance on the German Defensive Spears. The Light
Horse discover German Skirmishers in the wood.
The Milanese Crossbowmen advanced rapidly on the German Defensive Spears and opened fire. With a click and a clack, not a quarrel hit (I rolled four1's). Out on the flank, the Light Horse approached the small wood, only to discover a big surprise - a fine crop of German Handgunners.

Meanwhile, the German Crossbowmen were maneuvering around the left of the Defensive Spears, At this point, things were looking a little dodgy for the Milanese, even with the Sub-General rushing the pike block forward to support the Milanese Crossbowmen.

The left flank face-off - the Milanese Light Horse approach the flank of the
German Knights. 
On the left flank, the German Knights were closing with the Milanese Knights. By this stage, the Milanese Light Horse had reversed direction and were threatening the flank of the right-hand German Battlegroup.

Milanese Famiglia Ducale (with General) and Mercenary Men-at-Arms
about to engage the German Knights with their General
The right-hand Milanese Famiglia Ducale Battlegroup and the Men-at-Arms Battlegroup squared off against the left-hand German Knight Battlegroup.

On the right flank, the Milanese Light Horse high-tail it for safety
Back on the right flank, the Milanese Light Horse quickly discovered that small Battlegroups shouldn't get into fire-fights with large ones.

With the German Crossbowmen advancing on them, and the Handgunners emerging from the wood, the Milanese Light Horse were forced to fall back towards the scrub.

Knight Fight! - Huge melee between the Knight Battlegroups rages. In this particular round, the Milanese Battlegroups inflicted more casualties then they received.
Back on the left flank, a huge melee between two Milanese and two German Knight Battlegroups ground on. Slowly, but surely, the Milanese began to gain the upper hand.

The left-hand Famiglia Ducale Battlegroup is routed by the German Knights
Meanwhile, the left-hand Famiglia Ducale unit was routed by the right-flank German Knight Battlegroup, but the tenacious Milanese Light Horse hung onto their flank, preventing a break-through.

The Milanese Crossbowman shoot holes in the German Defensive Spears
 while the German Crossbowmen wheel to engage on the right flank
Back on the right flank, the Milanese Crossbowmen moved closer to the German Defensive Spears. Having found the range, they unleashed a deadly volley of bolts. Attempting to charge, the Defensive Spears failed their morale test and hunkered down behind their shields. Meanwhile, the German Crossbowmen were frantically wheeling to engage the Milanese, only to find their maneuvers had brought them within range of the Milanese guns.

The Milanese Crossbowmen break the German Defensive Spears
 A second devastating volley fragmented the German Defensive Spears. With a shout, the Milanese Crossbowmen charged home, slaying the German Sub-General, routing the German Spearmen, and sending them fleeing from the field.

Things go badly for the German Left
With the German Defensive Spears in rout, the Milanese Pike swung round to threaten the German Crossbow Battlegroup. Already, several volleys from the Milanese Heavy Guns had shaken this unit, and they would soon be joining their fellows in flight.

End of the Battle, the main German Knight Battlegroups route and their General is slain.
Back on the left flank, the victorious German Knight Battlegroup was still entangled with the tenacious Milanese Light Horse when the main German Knight unit finally routed. I can't recall exactly, but I think the German Comander-in-Chief may have been slain in the final round of combat.

At this point Jonathan conceded but, when we did a points tot-up, it appears his army had reached its break point any way.

It was my first game of Field of Glory in several years, and the first game for Jonathan where he had to worry about gunpowder and guns, so we may well have missed, or miss-applied, some rules. All in all, a very enjoyable game (possibly helped by me winning) and reminiscent of WRG 7th Edition, though without the excessive geometry. I notice that the Field of Glory 2nd Edition rules appear to be out of print, currently, though there was mention of a 3rd Edition in development on a discussion board I found while attempting to source a copy of the rules.

I look forward to playing another game soon.

Tuesday, 19 January 2016

[15mm Fantasy] Kings of War Battle #2

Over the last couple of months I've been painting up 15mm fantasy figures for an Army of the Unseelie Courts - sinister Elves and their allies. I'm currently trialing Kings of War from Mantic Games as a possible fantasy massed battle ruleset - the Basic 2nd Edition rules are available for free from here.

Apologies for the poor quality of some of the photos - my camera does not like trying to capture small details in average ambient artificial light.

Last Friday night John came over for a game of Kings of War and fielded a 1500 point Kingdoms of Men army, using figures from his Maximilian Imperial DBR army.

Kingdoms of Men Army - L - R: Troop of Mounted Scouts; Regiment of Knights; Regiment of Arquebusiers; Pike Block Horde; Army Standard Bearer Hero; Regiment of Arquebusiers; Wizard Hero; Two Cannon; Regiment of Knights; General Hero
To keep things simple (it was John's first game and my second), I decided not to use Artifacts or any other funky stuff. This was the army I selected:

Army List for the Unseelie Court, with Orc Allies
Army of the Unseelie Court: L - R: Two Troops of Gargoyles, Regiment of Trolls; Hydra; Dark Lord on Black Pegasus; Troop of Dark Elf Crossbowmen; Three Regiments of Dark Elf Spears; Troop of Dark Knights; Regiment of Orcs; Troop of Orc Gore Riders
Terrain was straight forward as well - a hill on the Dark Elf Left Flank and a village (Blocking Terrain) on the Dark Elf Right Flank. We played on a 3' x 3' table, and changed all movement distances and ranges from inches to centimeters.

As the battle began, both the Dark Elves and the Kingdoms of Men advanced their right flanks, while refusing their left wings. I quickly realized that there was quite a way to go to cross the table to engage the Kingdoms of Men left, and that I could potentially take a lot of fire from their guns and arquebusiers before I had to deal with their Knights.

L to R: Gargoyles attack the Kingdom's of Men Heavy Gun. The KoM Knights came under fire from the Dark Elf Crossbowmen and started to take casualties and waver. The KoM General positioned himself for a flank attack. Dark Elf spears wheel to engage the rest of the KoM line. The Trolls and Dark Elf Crossbowmen press forward, with the Hydra and the Dark Lord in support. 
Double-Moving, the Dark Elf right wing pressed on past the village. The two Gargoyle troops swept in to attack the heavy guns while the Dark Elf Crossbow troop opened fire on the Kingdom Knights, causing them to waver. The Mannish Wizard and the guns quickly dispatched one troop of Gargoyles, but the other troop managed to attack one of the guns.

The Kingdom Knights prepare to charge the Regiment of Trolls
Under a subsequent hail of crossbow bolts, the Kingdom Knights pulled themselves together (passed a second Waver test - rats!) and charged the Troll regiment. The fury of their charge swept the Trolls away.

Behind the Right Flank of the Kingdoms of Men: As the Mounted Scouts and the Knights moved forward, the Dark Elf Dark Knights and Orc Gore Riders seize the hill top. Behind them, the Orc Regiment moves up in support.
Meanwhile, on the Dark Elf left flank, the Dark Knights and Orc Gore Riders secured the hilltop, with the Orc Regiment moving up behind them. In the center, the Dark Elf spear regiments began to drift to the left to better engage the Mannish Pike Block horde.

The Orc Gore Rider troop charged the Mannish Scouts and rapidly chased them away, while the Mannish Knights charged the Dark Elf Dark Knights. The Dark Knights fled and the Mannish Knights impetuously surged after them (John rolled a 4 for the Follow Up). This nicely exposed their flank to the Orc Gore Riders who promptly charged home - flank charges by decent units, even as small as a Troop, can be devastating in the flank. The Mannish Knights routed, exposing the flank of the infantry line.

With casualties mounting, the Dark Elf right looked set to collapse, but the rout of the Mannish Knights relieved the pressure.
Back on the right flank, with the Troll regiment and the two troops of Gargoyles routed, the Dark Elf right was looking a little tatty. Reforming from defeating the Trolls, the Mannish Knights attacked the Hydra and the Dark Lord, but were repulsed. A volley from the Dark Elf crossbowmen caused a waver test which the Knights failed in rather a spectacular fashion. With one of the Mannish guns wavering, the other gun and the Mannish Wizard rained shot and shell and Lightning Bolts down on the Dark Elf crossbowmen.


In the center, the left-most Dark Elf Spear Regiment engaged a Mannish arquebusier regiment. The Orc Gore Riders were able to sweep in on their flank with another flank attack which shattered the Arquebusiers. The center Dark Elf Spear regiment took on the Mannish Pike Horde and suffered heavy casualties, while the right-most Dark Elf Spear Regiment was scattered by the second Mannish Arquebusier regiment.

At this point we completed Turn 6 and rolled to see if the battle would continue - it did not. After a quick points tot-up, we discovered that we had achieved a Draw - a difference of 85 points between both sides which is less than the 150 points (10% of army points) needed to determine victory. So this was a Losing Draw to the Dark Elves and a Winning Draw to the Kingdoms of Men.

It was a fun battle and fortunes changed several time over the course of the game. A 3' wide table seems to be a good width for a 1500 point 15mm battle, though 3' deep may be a little deep. As we both advanced cautiously, it wasn't until about Turn 3 we actually came within range.

John's already planning his revenge for the next game.