 |
| Beastman Army from Microworld Games |

Ruminations upon Victorian Science-Fiction, Samurai Skirmish Games, 15mm Fantasy Skirmish, 15mm Wargames, 10mm Wargames, RPGs, 6mm Fantasy, and 6mm Science Fiction Wargaming
Showing posts with label Men of the West. Show all posts
Showing posts with label Men of the West. Show all posts
Saturday, 4 January 2014
[RRtK] Family Snapshots
Monday, 30 December 2013
[RRtK] Campaign Spring 1012: The Battle of Barzak Vale
Spring 1012: The Battle of Barzak Vale
Duke Grimoald of Oberlichenwald in Valgasmaa lead an army of 7250 men on a raid against Mt Hofburg, the capital of the Szepetnek Mountains. Serogn, the Goblin King of the Szepetnek Mountains, assembled an army of 11,800 warriors and offered battle to the invaders in Barzak Vale, just south of Mt Hofburg.

On the grassy plain at the northern end of the Vale, Serogn deployed his wolf riders in a column at the right of his line. He then deployed his Goblins in a double column, with his archers in a line parallel with the head of the column. Behind the archers, he stationed his Ogres, while his Black Moon Goblins were stationed in reserve, parallel with the rear of the Goblin column.
Over the central hill, across the southern end of the Vale, Duke Grimoald drew up his army. His Light Horse formed his left wing while two units of archers formed his skirmish line. Behind them, Grimoald formed up his two units of knights in front of a pike unit and three units of Men-at-Arms. On his right flank, Duke Grimoald placed another unit of archers and two units of Arquebusiers.
Hesitantly (as, after deployment, I realized that with a WR of 2, Grimoald could only activate two groups per turn), Duke Grimoald pushed forward the Light Horse on his left flank, and the Archers and Arquebusiers on his right, while refusing his center. Over the hill, King Serogn dispatched his wolf riders against the Light Horse while ordering his mass column of foot to advance. The faster moving Archers, with the Ogres in support, pulled ahead and gained the crest of the ridge, while King Serogn remained to the rear with his two units of Black Moon Goblins.
On Duke Gimoald's left flank, the Mercenary Light Horse was soon engaged with the Wolf Riders. After a short action, one unit of Wolf Riders fled the field while the other retired to the very margin, where it waited the result of the battle.
On Duke Grimoald's right flank, the Archers and Arquebusiers soon caused the Goblin Archers to retire in confusion. He had halted the Archers covering his front and moved his battle line closer to the hill, even as the Goblin column crested it, halted, and began to expand into line. Grimoald ordered his Light Horse to harass the end of the Goblin line, even as his Knights moved up to attack the Ogres on the hill.
As King Serogn moved his Black Moon Goblins up to fill the gap on the Goblin left, the Valgasmaani Knights charged home. Both the Ogres and the Black Moon Goblins held the charge of the Knights and threw them back. It was here that Duke Grimoald discovered that his line of infantry were too close behind the Knights.
Again and again, the Knights charged desperately up the hill against the Ogres and Black Moon Goblins and, again and again, they were thrown back. King Serogn in his chariot led the Black Moon Goblins to first hold, and then to advance against the Knights.
On the Goblin right, the lead units of the great Goblin column charged down the hill, dispersing the Light Horse and sweeping away the Valgasmaani Men-at-Arms unit on the left of the Human battle line. In desperation, Duke Grimoald about faced the rest of his foot and marched them back to give room to the Knights struggling on the lower slopes of the hill. The careful withdrawal quickly became a rout as the Knights, exhausted from the battle on the ridge, broke and ran.
Seeing that the battle was lost, Duke Grimoald quit the field. Two units of Archers were lost in the rout but the rest of the army eventually reassembled at Oberlichenwald a couple of days later.
Well, that was a fun battle. I'm pretty sure I got some rules wrong, and the Retire rule caught me out with Duke Grimoald's deployment. As Grimoald has a WR of 2, I am assuming that what he lacked in experience, he attempted to make up for in enthusiasm.
King Serogn was in a tight spot. With two invasions, he had to decide whether to split his army and attempt two battles (and risk defeat in detail), or concede a province, risk unrest, but concentrate on beating his toughest foe first. Having beaten back the Valgasmaani, his gamble may have paid off as Kypselos' Beastmen have fielded a smaller force - though they do have a mage.
The Goblin figures in this battle are by Baccus 6mm while the Ogres and Lesser Goblin Archers are by Irregular Miniatures. All the Human figures are from Irregular Miniatures Men of the West range.
Duke Grimoald of Oberlichenwald in Valgasmaa lead an army of 7250 men on a raid against Mt Hofburg, the capital of the Szepetnek Mountains. Serogn, the Goblin King of the Szepetnek Mountains, assembled an army of 11,800 warriors and offered battle to the invaders in Barzak Vale, just south of Mt Hofburg.
| The Goblin Army | Valgasmaa Army | |||||
| 5 | Archers | Foot Skirmish | 2 | Knights - Elite, Shock | Mounted Melee | |
| 8 | Goblins | Foot Melee | 3 | Archers | Foot Skirmish | |
| 1 | Ogres | Foot Melee | 3 | Infantry | Foot Melee | |
| 2 | Wolf Riders | Mounted Skirmish | 2 | Mercenary Arquebusiers | Foot Missile | |
| 2 | Black Moon Goblins | Foot Melee | 1 | Mercenary Pike | Foot Melee | |
| 2 | Mercenary Light Horse | Mounted Skirmish | ||||

On the grassy plain at the northern end of the Vale, Serogn deployed his wolf riders in a column at the right of his line. He then deployed his Goblins in a double column, with his archers in a line parallel with the head of the column. Behind the archers, he stationed his Ogres, while his Black Moon Goblins were stationed in reserve, parallel with the rear of the Goblin column.
 |
| Barzak Vale - the armies deploy |
 |
| The right of the Goblin Line |
 |
| The left of the Goblin Line |
 |
| The Valgasmaani deployment |
 |
| The main Valgasmaani battleline |
 |
| The Valgasmaani right flank |
Hesitantly (as, after deployment, I realized that with a WR of 2, Grimoald could only activate two groups per turn), Duke Grimoald pushed forward the Light Horse on his left flank, and the Archers and Arquebusiers on his right, while refusing his center. Over the hill, King Serogn dispatched his wolf riders against the Light Horse while ordering his mass column of foot to advance. The faster moving Archers, with the Ogres in support, pulled ahead and gained the crest of the ridge, while King Serogn remained to the rear with his two units of Black Moon Goblins.
 |
| The Goblin battle line crests the ridge |
 |
| The Wolf Riders battle the Light Horse |
 |
| Midway through the battle, the Knights are not making headway in the center while the Valgasmaa skirmishers and Light Horse are having success on the flanks |
As King Serogn moved his Black Moon Goblins up to fill the gap on the Goblin left, the Valgasmaani Knights charged home. Both the Ogres and the Black Moon Goblins held the charge of the Knights and threw them back. It was here that Duke Grimoald discovered that his line of infantry were too close behind the Knights.
 |
| The Goblins begin to push down the southern slope of the hill |
On the Goblin right, the lead units of the great Goblin column charged down the hill, dispersing the Light Horse and sweeping away the Valgasmaani Men-at-Arms unit on the left of the Human battle line. In desperation, Duke Grimoald about faced the rest of his foot and marched them back to give room to the Knights struggling on the lower slopes of the hill. The careful withdrawal quickly became a rout as the Knights, exhausted from the battle on the ridge, broke and ran.
Seeing that the battle was lost, Duke Grimoald quit the field. Two units of Archers were lost in the rout but the rest of the army eventually reassembled at Oberlichenwald a couple of days later.
Well, that was a fun battle. I'm pretty sure I got some rules wrong, and the Retire rule caught me out with Duke Grimoald's deployment. As Grimoald has a WR of 2, I am assuming that what he lacked in experience, he attempted to make up for in enthusiasm.
King Serogn was in a tight spot. With two invasions, he had to decide whether to split his army and attempt two battles (and risk defeat in detail), or concede a province, risk unrest, but concentrate on beating his toughest foe first. Having beaten back the Valgasmaani, his gamble may have paid off as Kypselos' Beastmen have fielded a smaller force - though they do have a mage.
The Goblin figures in this battle are by Baccus 6mm while the Ogres and Lesser Goblin Archers are by Irregular Miniatures. All the Human figures are from Irregular Miniatures Men of the West range.
Wednesday, 30 October 2013
[RRtK] 6mm Painting Progress
Last week, my first order of 6mm Irregular Miniatures Men of the West figures arrived from Eureka Miniatures in Australia. It took me a little while to work out a basing system I was happy with, but once that was done, the actual painting went pretty quick.

I ended up using plastic card for the bases and decided to go with a 40mm frontage and a 20mm depth. Generals and heroes are mounted on washers.

Skirmisher Archers are mounted five to a base - 1 strip; Melee Infantry (billmen) are 20 to a base - 4 strips in two rows; Pike are 30 to a base - five strips plus a command strip in three rows; Heavy Cavalry (knights) are eight to a base - 2 strips, although I had to trim some of the strips to fit the 40mm frontage; Skirmisher Crossbowmen are mounted six to base - 1 strip plus a spare pikeman as a standard bearer; Light Cavalry are mounted five to a base - 1 strip.

The General is from the Champions pack which consists of one mounted and three foot Champions. I added a spare Knight as an army standard bearer (I still have to make the standards).

The three pike units look quite impressive when viewed from this angle. I was rather pleased in the amount of detail I was able to catch on this figures, including the archers' hands.
I have another order inbound from Eureka Miniatures to give me more Knights and Melee foot troops, plus some shot. Lined up to paint next are my Goblins from Baccus - though I will need to get some Goblin archers from Irregular/Eureka as Baccus doesn't make Goblin Archers. And after the Goblins in the painting cue, are the exquisite Beastmen from Microworld Games.
Thursday, 24 October 2013
[RRtK] Teeny, Tiny Toy Soldiers Arrive
Yesterday, my first order of 6mm figures for my Rally Round the King project arrived from Nic at Eureka Miniatures. I had ordered a selection from the Irregular Miniatures Men of the West range as the basis of the Valgasmaan army, and then spent a couple of hours working out how I was going to base them.
I have decided to use 40mm x 20mm plasticard bases as the frontages match other basing systems, and the plasticard is both thinner, and not likely to curl like card. At the moment, I'm intending to base the heavy infantry four strips to the base, while the pikemen will be six strips to a base (five strips of pike and a command strip). Light Horse are one strip (six figures) while the Knights will probably be two strips to a base.


While I haven't done any more work on my campaign map, I have had some further thoughts.

The white area in the northern, snow-capped mountains is a glacier, which is also the source of the Great River. The glacier is called the Rimebeard and is rumoured to be the hold of the Mountain Giants. The province of Jaebelitz, north of Mt Gorfang, has been over run by an army of Beastmen, who are determined to establish their own state. Foranimenagii explorers are attempting to establish a colony on new-found lands to the south of the sea. They will soon discover that these lands are not empty.
I have decided to use 40mm x 20mm plasticard bases as the frontages match other basing systems, and the plasticard is both thinner, and not likely to curl like card. At the moment, I'm intending to base the heavy infantry four strips to the base, while the pikemen will be six strips to a base (five strips of pike and a command strip). Light Horse are one strip (six figures) while the Knights will probably be two strips to a base.

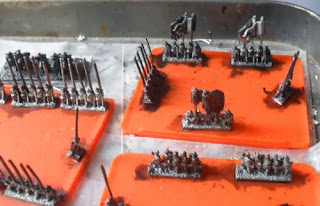
So, once I had the basing worked out, I had to snip some of the strips to fit everything on the way I wanted them, and then tack-glued the figures to some painting trays. Today, I undercoated everything - I'm pretty impressed with the amount of detail that a wash of watery black undercoat brought out.

The command strips, top right, has a pair of nicely moulded flags though, at this scale, they're probably about six inches thick.

The Knights have Maximilian-style metal barding. The lances, apparently, are a point of weakness so I have been very careful when straightening them.
I'm looking forward to putting some colour on these guys.
While I haven't done any more work on my campaign map, I have had some further thoughts.

The white area in the northern, snow-capped mountains is a glacier, which is also the source of the Great River. The glacier is called the Rimebeard and is rumoured to be the hold of the Mountain Giants. The province of Jaebelitz, north of Mt Gorfang, has been over run by an army of Beastmen, who are determined to establish their own state. Foranimenagii explorers are attempting to establish a colony on new-found lands to the south of the sea. They will soon discover that these lands are not empty.
Monday, 21 October 2013
[RRtK] Small Beginnings
Arkansan, on The Miniatures Page, asked whether gamers developed their own worlds for wargaming. This was a rather synchronistic question as he is planning to run a solo Rally Round the King campaign, as I am, and I am in the process of developing the initial maps for my campaign world.
 The consensus amongst the respondents on the TMP thread was to start out small. The danger of trying to map everything before play begins is that you just keep mapping and never get to play. Having done this sort of thing in the past, I concur.
This time, I started doodling around with an abstract "province", or area, map first.The idea was to establish the relationship between various locations before I actually began the more pictorial style map.
Now, I could have just used the map of Talomir from the Rally Round the King book, but where's the fun in that? As I had Men of the West from Irregular Miniatures, Goblins from Baccus, and Beastmen from Microworld all on their way to me, as well as being rather taken with the City States Country type from the rules, that sort of indicated what areas I needed to develop.
The four lower boxes in the map, above, are the four provinces of the Foranimenagii City States (each province contains a city) which stretch along the northern coast of the sea. In 15mm, I have an Italian Condotta Army and have always been interested in Italian History from the Medieval period through to the Renaissance. I therefore decided that the Foranimenagii States are Italian-ish in culture, are trading ports, and have a reasonable technology level.
Inland from the Foranimen Coast lies Valgasmaa (the four red provinces). Valgasmaa - home of the Men of the West - is a unified, late Medieval-type Kingdom. Three of the Valgasmaan provinces lie along a major river that continues south through a Foranimenagii province, before falling into the sea. The eastern province of Valgasmaa is a rolling plain, bounded along its eastern march by another river. A chain of mountains (the green provinces) forms Valgasmaa's northern border. A pass, to the north-east, leads to a transmountain province, but this province is now independent.
The transmountain province became cut off from the southern provinces of Valgasmaa when a tribe of Goblins moved into the mountains. From Mt Gorfang, the Goblins were able to close the pass and this left the transmountain province to fend for itself.
At this point, I have two potential conflicts - Valgasmaa vs the Goblins, to drive them out of the mountains and reopen the pass to the north; and Valgasmaa's march to the sea, a campaign to secure the mouth of the Great River and give Valgasmaa access to the lucrative sea trade.
Now to fill in the details.
Edit: And here's the map with some work done on it:

This time, I started doodling around with an abstract "province", or area, map first.The idea was to establish the relationship between various locations before I actually began the more pictorial style map.
Now, I could have just used the map of Talomir from the Rally Round the King book, but where's the fun in that? As I had Men of the West from Irregular Miniatures, Goblins from Baccus, and Beastmen from Microworld all on their way to me, as well as being rather taken with the City States Country type from the rules, that sort of indicated what areas I needed to develop.
The four lower boxes in the map, above, are the four provinces of the Foranimenagii City States (each province contains a city) which stretch along the northern coast of the sea. In 15mm, I have an Italian Condotta Army and have always been interested in Italian History from the Medieval period through to the Renaissance. I therefore decided that the Foranimenagii States are Italian-ish in culture, are trading ports, and have a reasonable technology level.
Inland from the Foranimen Coast lies Valgasmaa (the four red provinces). Valgasmaa - home of the Men of the West - is a unified, late Medieval-type Kingdom. Three of the Valgasmaan provinces lie along a major river that continues south through a Foranimenagii province, before falling into the sea. The eastern province of Valgasmaa is a rolling plain, bounded along its eastern march by another river. A chain of mountains (the green provinces) forms Valgasmaa's northern border. A pass, to the north-east, leads to a transmountain province, but this province is now independent.
The transmountain province became cut off from the southern provinces of Valgasmaa when a tribe of Goblins moved into the mountains. From Mt Gorfang, the Goblins were able to close the pass and this left the transmountain province to fend for itself.
At this point, I have two potential conflicts - Valgasmaa vs the Goblins, to drive them out of the mountains and reopen the pass to the north; and Valgasmaa's march to the sea, a campaign to secure the mouth of the Great River and give Valgasmaa access to the lucrative sea trade.
Now to fill in the details.
 |
| Stage one of the actual map, made in Hexographer |
 |
| Now it looks more like the sketch map |
Subscribe to:
Comments (Atom)